What’s big and slow and rarely ever useful? For one thing, the software that comes with every desktop-grade Uninterruptible Power Supply (UPS) made by APC. This isn’t news. I know APC would like nothing more than to have me buy a more expensive piece of hardware that I don’t need, just to get the useful software that I do need.
Enter APCUPSD with USB support for Windows. It’s free. It’s open source. It’s probably not supported by APC, but if you’ve ever tried to get tech support for a desktop-grade APC unit that was connected to a server, you already know APC isn’t going to help you with computer problems. This free piece of software makes my UPS more useful than just a battery with a power switch. Now I can have my server send a text message to my mobile phone whenever a blackout strikes my area. I can see live power management statistics from any web browser in the world, including the one on my phone. I have fewer things to monitor with regard to uptime, and I love it.
Step 1: Get Rid of PowerChute
Making all of this magical automation work by itself starts out with simple steps. Go to the Add or Remove Programs Control Panel, uninstall PowerChute from the computer, and then install APCUPSD. Sounds easy so far, right?
Step 2: Run the APCUPSD Setup Wizard
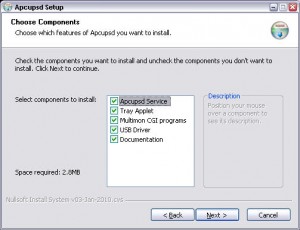
The setup file I used was named winapcupsd-3.14.8.exe. This is where you might begin to sense that this isn’t going to be as easy as you had hoped. The installation wizard for Windows asks a bunch of questions for which you will not find answers in the documentation. Here’s my understanding of them.
Choose Components
- Apcupsd Service – This should be installed if the USB cable from a UPS is connected directly to this computer. It does all of the monitoring for you.
- Tray Applet – This is similar to the graphical interface of PowerChute. It sits in the system tray and takes up space doing nothing useful. This can be installed on any computer.
- Multimon CGI programs – This should be installed on web server computers so that the UPS status can be seen through the Internet.
- USB Driver – This is part of the Apcupsd Service and should be installed at the same time as the first component.
- Documentation – You will want at least one copy of this to be installed.
Step 3: Edit apcupsd.conf
The setup wizard actually does a nice job of providing a default configuration that is compatible with USB-connected APC units. In my opinion, there is only one part of the configuration that needs close attention.
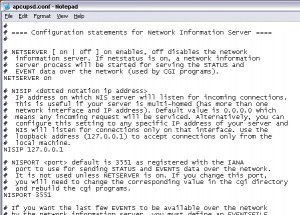
APCUPSD turns your computer into a public server by default, using “NETSERVER on” and “NISIP 0.0.0.0”. This is really inappropriate unless you intend to involve multiple computers and a firewall in your UPS monitoring plan. My screenshot shows how to limit access by using “NISIP 127.0.0.1”. Changing the configuration in that way will prevent any other computer from directly viewing your UPS information. Do not jump to the conclusion that it might be easier to use “NETSERVER off”. The Tray Applet and CGI components both rely on the server capabilities of the monitoring service to interact with the UPS.
Another area that may be of interest is system logging. Unfortunately, I am only able to describe all of the ways in which this doesn’t work on Windows. Setting STATTIME to a non-zero value causes the apcupsd.status file to be continuously overwritten. Setting “LOGSTATS on” causes a flood of useless messages to appear in the Application Event Log. And finally, setting DATATIME to a non-zero value logs a set of comma-separated values, but only in the Application Event Log. All of these options seem potentially very useful, but I couldn’t find any explanation of how to make them work in a Windows environment.
Step 4: Hack the Registry

Here’s where things really start getting sloppy. The developers had neither the confidence in their shutdown code, nor the foresight about a missing installation step needed to make this easy. If you want your UPS to turn off after your computer shuts down during a blackout, and then turn back on when the power is restored, you have to change this registry value. It’s located at HKLM\System\CurrentControlSet\Services\Apcupsd\ImagePath and all you have to do is add “-p” on to the end of it. This also makes you familiar with what to erase if your UPS starts turning off at the wrong time.
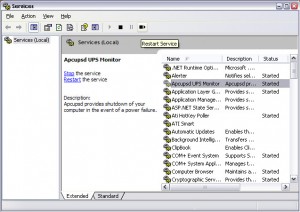
As you might have guessed, editing the registry does nothing until you reboot the computer or restart the monitoring service. I prefer the latter method because this will have to be done after any changes to the apcupsd.conf file.
Step 5: Mobile Alerts From Your UPS
This is my favorite step. For all of its bragging about being designed to send notification e-mails, APCUPSD hardly does that at all. It’s designed to call a batch file for each event triggered by the monitoring service, and those batch files are not provided. The good news is that as soon as you can figure out how to send an e-mail from a batch file, you’re all set. I decided that because my server already has the PHP engine installed and configured for outgoing e-mail, and because I wanted to keep this simple, all I had to do was call the PHP mail command from my batch file. My example file is named <apcupsd location>\etc\apcupsd\onbattery.bat and it only has one line of code in it:
php -r "mail('my.mobile.address@domain.com','UPS Alert','Power failure. Running on UPS battery.');"Now, in theory, I should see that appear as a text message on my mobile phone as soon as the next blackout happens. This depends on my ISP not being blacked out at the same time, among other things.
Windows Native Solution
There is a way to do this without installing software such as PHP. As suggested by the presence of an onbattery.vbs.example file, you might be able to use the built-in scripting engine to generate e-mails for you. But I must offer several warnings:
- Do not attempt to implement the onbattery.vbs.example file. It is full of bugs and excessively complicated.
- You will need to have the IIS v6.0 SMTP service fully operational already to make this easy.
- If you are unable to run .vbs files for any reason, then this will not work at all.
What you will need to do is drop several lines of code into a new file.
Put the file at: <apcupsd location>\etc\apcupsd\onbattery.vbs
Customize the middle four lines of this stuff and put it in the file:
Set Msg = CreateObject("CDO.Message")
Msg.To = "my.mobile.address@domain.com"
Msg.From = "upsd@domain.com"
Msg.Subject = "UPS Alert"
Msg.TextBody = "Power failure. Running on UPS battery."
Msg.Send
If all goes well, you can double click that new file and see a message arrive at your e-mail address. APCUPSD will trigger the same file for you whenever the onbattery event occurs.
If this doesn’t go well, or if you need help customizing this script, I suggest visiting Stack Overflow for some beginner-level mail scripting advice.
Preventing Nuisance Alerts
If your UPS lives in a noisy electrical environment, then you will want to tweak the apcupsd.conf file again. The conf file contains a parameter named ONBATTERYDELAY that suppresses alerts for rapid switching between battery and line power. It defaults to 6 seconds, which means you could get 20 on/off alerts every minute when the UPS is simply doing its job. A new value of 30 seconds or more will provide you with only the more critical alerts.
Step 6: Install the CGI program on IIS v6.0
If you thought those last few steps were tricky, then prepare yourself. In fact, since this IIS web server is entirely optional, I am providing these instructions more for my own reference than as a tutorial. It is assumed you already have an IIS website up and running, so the full details of making a website from scratch are beyond the purpose of this article.
To get the APCUPSD information to display on an IIS v6.0 website, you must first create a “cgi-bin” area where it is allowed to run. It doesn’t have to be named “cgi-bin”, but it has to accomplish the same thing, and should not be located anywhere someone could upload a virus. So, pick out a website, or a subdirectory, or a virtual directory anywhere you like in the Internet Information Services (IIS) Manager. Into that directory, you will need to copy the files from <apcupsd location>\cgi\ and make sure they all end in .cgi. I ended up with four .cgi files and an extra file named mingwm10.dll that doesn’t seem to do anything, so I left that one out.
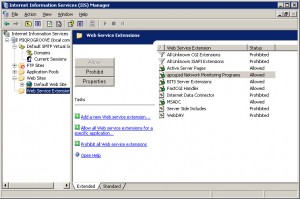
Next, go back to the IIS Manager and click on Web Service Extensions.
Click on “Add a new web service extension…”
Now you can enable the .cgi files that you’ve placed on your website. Give this “Extension” a new name as you like, and add each of the four files to the “Required files” list. Make sure that you do not use any UNC paths here. They must be local drive letter paths for this to work. After the files are added, make sure the new extension is set to Allowed.
To make your web directory a true “cgi-bin,” go to the Properties of that directory in IIS Manager, find the “Execute permissions” drop down box, and set it to “Scripts and Executables.” If all else fails, you can try reading KB 315122 which pretty much says the same thing, but in true Microsoft style makes you feel clueless and empty inside.
Finally, click on “Application Pools” in IIS Manager, right-click on the one you’re using (probably DefaultAppPool) and then click Recycle. Much like the monitoring service itself, your CGI application pool has to be restarted every time the settings change in IIS Manager.
Well, maybe not finally. All that work was just to get IIS configured. To configure the CGI application itself, you must ensure that the two files named apcupsd.css and hosts.conf are located in a directory that is named exactly C:\apcupsd\etc\apcupsd\ If you installed APCUPSD into any path other than C:\apcupsd\ then you must create that path now and copy the two files. If your web server is not the same computer that the UPS is connected to, then you must also edit the hosts.conf file so that it points to the address of the other computer.
Now you should be able to aim your web browser at /multimon.cgi and see the UPS information from anywhere you can see the website.
Hello, what bout installing multiple USP on one PC?
Hi Tomas, the Windows version of APCUPSD does not support multiple UPS connections.
Hi there, excellent tutorial
I am using the scripts APCUPSD has to send email to me during a power outage perfectly, but, do you have any idea how to program APCUPSD to send an email “before” it shutdown my system, you know, because the UPS battery charge is very low?
Many thanks
Hi Javier, all of the power outage emails are sent “before” shutdown. The low battery event will cause the loadlimit.bat file to run. If you have the onbattery.bat file working already, it should be nearly the same code. Perhaps you will notice the opposite problem then; APCUPSD has no way to alert you that the power is back on after a reboot. 🙂
Thank you very much… You are right about that the APCUPSD has no way to alert you that the power is back on after a reboot.
Following your indications, I have created two new files, “timeout.vbs” and “loadlimit.vbs” using the same code of my “onbattery.vbs”, of course, with the appropriate text alert. So, whichever status occurs first, either “timeout” or “loadlimit”, you know, called by apccontrol.bat, will run the corresponding vb-script some milliseconds before or at the same time “shutdown.exe” has been executed.
Before putting this changes in production, I have to do some tests, you know, to make sure that none of these new vb-scripts will stop the shutdown process.
Hi. My windows server shutdowns, but when the power is back before the battery is completly dead, it wont turn on automatically (cause the UPS never shuts down). Any suggestions? Thank you